Decompressing Concatenated GZIP Files in C# – Received From AWS CloudWatch Logs

I was writing a solution in C# to use AWS Lambda and AWS CloudWatch Logs subscriptions to process and parse log files delivered from EC2 instances. The setup is simple enough, the SSM Agent or EC2Config service delivers the log files to CloudWatch Logs. The Log Group has a Subscription that streams the log files to S3 via Kinesis Firehose. This could also be setup where the logs are streamed to a CloudWatch Logs Destination in another account that is tied to a Kinesis Firehose Delivery Stream in that account. At this point, the S3 bucket has an event that is triggered any time an object is created and that event calls a Lambda function. The Lambda function downloads the object delivered to S3 and does some stuff: this is where the complication happens.

The Kinesis Firehose stream is configured to deliver the log files in a .ZIP format. That’s fine, I use the standard ZipArchive class to unzip that file and put the contents into a temp folder. There’s only ever 1 file in the .ZIP, but I do something like the following:

using (FileStream ReadStream = new FileStream(filePath, FileMode.Open, FileAccess.Read, FileShare.Read))
{
  using (ZipArchive Archive = new ZipArchive(ReadStream))
  {
    Archive.ExtractToDirectory("/tmp");
  }
}

The output extracted to /tmp however is also compressed by AWS using the GZIP compression algorithm (no extension on the file though). I thought fine, I’ll use the native C# GZipStream class. But the results I was expecting to see when retrieving the file content from this stream didn’t match the logs I knew were being sent to CloudWatch Logs. In fact, it appeared that I was losing numerous events. The reason for this is because AWS is concatenating multiple GZIP files, each containing 1 or more log events, into a single binary object, which is what is delivered to S3 (or inside another wrapper of compression if that is what you configure for your Kinesis Firehose stream). The GZipStream doesn’t handle this concatenation, it stops after it reaches the End Of File (EOF) for the first GZIP block of bytes in the overall file, so any other log events are lost. Other technologies like 7Zip correctly manage this, but I wanted to keep my dependencies low and not have to bundle additional software in my Lambda function (which introduces more overhead).

I took a look at the byte contents of the entire GZIP file delivered by AWS looking for the beginning or EOF pattern. I noticed this pattern, which was repeated twice, and matched the set of two log events that I could see when opening it with 7Zip.

0x1F
0x8B
0x8
0x0
0x0
0x0
0x0
0x0
0x0
0x0

What does this pattern mean?

Bytes 0 – 1 : The GZIP signature, 0x1F and 0x8B are the indication that the rest of the file is a GZIP

Byte 2 : The compression method

Bytes 3-7 : Last modification time

Byte 8 : Compression Flags

Byte 9 : Operating System

The overall GZIP header is 10 bytes long. I also saw a pattern for the EOF

0xF3
0x9
0x0
0x0

But I wasn’t as confident in the consistency of this marker, so I decided to use the GZIP signature bytes to determine the beginning of files in the binary block delivered from AWS. I knew these 2 bytes would be consistent regardless of the other header information. My process then goes through all of the bytes in the file looking for this pattern, and if it is found, recording the byte index of the first matching byte. Then I chunk up the source file in multiple byte arrays and process each of those as a MemoryStream and send that to the GZipStream which I can then write out to a file or process. The code for this looks like this


/// <summary>
/// Provides a workaround to decompressing gzip files that are concatenated
/// </summary>
/// <param name="filePath">The path to the gzip file</param>
/// <returns>The decompressed byte content of the gzip file</returns>
private static async Task<byte[]> GUnzipConcatenatedFile(string filePath)
{
  //Get the bytes of the file
  byte[] FileBytes = File.ReadAllBytes(filePath);

  List<int> StartIndexes = new List<int>();

  /*
  * This pattern indicates the start of a GZip file as found from looking at the files
  * The file header is 10 bytes in size
  * 0-1 Signature 0x1F, 0x8B
  * 2 Compression Method - 0x08 is for DEFLATE, 0-7 are reserved
  * 3 Flags
  * 4-7 Last Modification Time
  * 8 Compression Flags
  * 9 Operating System
  */

  byte[] StartOfFilePattern = new byte[] { 0x1F, 0x8B, 0x08 };

  //This will limit the last byte we check to make sure it doesn't exceed the end of the file
  //If the file is 100 bytes and the file pattern is 10 bytes, the last byte we want to check is
  //90 -> i.e. we will check index 90, 91, 92, 93, 94, 95, 96, 97, 98, 99 and index 99 is the last
  //index in the file bytes
  int TraversableLength = FileBytes.Length - StartOfFilePattern.Length;

  for (int i = 0; i <= TraversableLength; i++)
  {
    bool Match = true;

    //Test the next run of characters to see if they match
    for (int j = 0; j < StartOfFilePattern.Length; j++)
    {
      //If the character doesn't match, break out
      //We're making sure that i + j doesn't exceed the length as part
      //of the loop bounds
      if (FileBytes[i + j] != StartOfFilePattern[j])
      {
        Match = false;
        break;
      }
    }

    //If we did find a run of
    if (Match == true)
    {
      StartIndexes.Add(i);
      i += StartOfFilePattern.Length;
    }
  }

  //In case the pattern doesn't match, just start from the beginning of the file
  if (!StartIndexes.Any())
  {
    StartIndexes.Add(0);
  }

  List<byte[]> Chunks = new List<byte[]>();

  for (int i = 0; i < StartIndexes.Count; i++)   
  {     
    int Start = StartIndexes.ElementAt(i);     
    int Length = 0;     
    
    if (i + 1 == StartIndexes.Count)     
    {       
      Length = FileBytes.Length - Start;     
    }     
    else     
    {       
      Length = StartIndexes.ElementAt(i + 1) - i;     
    }
    
    //Prevent adding an empty array, for example, if the pattern occured     
    //as the last 10 bytes of the file, there wouldn't be anything following     
    //it to represent data     if (Length > 0)
    {
      Chunks.Add(FileBytes.Skip(Start).Take(Length).ToArray());
    }
  }

  using (MemoryStream MStreamOut = new MemoryStream())
  {
    foreach (byte[] Chunk in Chunks)
    {
      using (MemoryStream MStream = new MemoryStream(Chunk))
      {
        using (GZipStream GZStream = new GZipStream(MStream, CompressionMode.Decompress))
        {
          await GZStream.CopyToAsync(MStreamOut);
        }
      }
    }

    return MStreamOut.ToArray();
  }
}

I also came up with a similar method to use in NodeJS because the native zlib library only reads the first stream as well.

var deferred = Q.defer();
//Path deals with files on the system
var path = require('path');

//Launch the native gunzip function from linux
//"-c" keeps the compressed version and writes the contents to stdout instead
var gunzip = require('child_process').spawn("gunzip", ["-c", path.normalize(zipPath)]);
var buffer = [];

var count = 1;

//Read the gzip contents and add them to the buffer, each data read is a stream in the gzip
gunzip.stdout.on("data", function (data) {
  console.log("Read stream #" + count++ + " from the gzip.");
  buffer.push(data.toString());
});

gunzip.stderr.on("data", function (data) {
  console.log("Error reading gzip file " + zipPath + " with error " + data.toString());
});

gunzip.on("error", function (err) {
  console.log("There was an error in gunzip " + err);
  deferred.reject(err);
});

gunzip.on("close", function (code) {
  console.log("GUNZIP Exit Code: " + code);

  if (code === 0) {
    //This joins all of the elements in the array
    buffer.join("");
    console.log("Log Key: " + key + "\nFile data:\n" + buffer.toString());

    //If the gzip was concatenated with multiple streams, there are several json objects but are not formatted as an array
    //This will parse the string and fix that
    console.log("Fixing up the JSON object.");

  try {
      var log = createJson(buffer.toString());
      console.log("Log Key: " + key + "\nFile data:\n" + log);
      deferred.resolve([log, key]);
    }
    catch (err) {
      console.log("Error creating the json: " + err);
      deferred.reject(err);
    }
  }
  else {
    console.log("Trying to read file as plain text.");
    fs.readFile(path.normalize(zipPath), 'utf8', function (err, data) {

    if (err) {
      console.log("Could not read as plain text with error " + err);
      deferred.reject(err);
    }
    else {
      console.log("Fixing up the JSON object from: " + data);

      try {
        var log = createJson(data);
        console.log("Log Key: " + key + "\nFile data:\n" + log);
        deferred.resolve([log, key]);
      }
      catch (err) {
        console.log("Error creating the json: " + err);
        deferred.reject(err);
      }
    }
  });
}

The remaining issue to handle is that the extracted log event contents aren’t valid JSON, you just have two JSON objects, so in the Javascript version you can see I have function, createJson, this brackets the objects in an array by appending “[” to the beginning and “]” to the end and putting a comma in between the two objects. That function is a totally separate discussion, but the need is there to convert your one, two, or more JSON objects written into a single or multiple streams into a valid JSON string that you can then parse later.

Hope this helps someone else when they run into the same problem!
NETCoreApp vs NETStandard and Self-Contained Deployments and Framework-Dependent Deployments

We’ll use this csproj file as a reference:

<Project Sdk="Microsoft.NET.Sdk">

<PropertyGroup>
<OutputType>Exe</OutputType>
<TargetFrameworks>netstandard2.0;netcoreapp1.1</TargetFrameworks>
<AssemblyName>ConsoleApp</AssemblyName>
<PackageId>ConsoleApp</PackageId>
<GenerateAssemblyConfigurationAttribute>false</GenerateAssemblyConfigurationAttribute>
<GenerateAssemblyCompanyAttribute>false</GenerateAssemblyCompanyAttribute>
<GenerateAssemblyProductAttribute>false</GenerateAssemblyProductAttribute>
<Version>1.0.0.1</Version>
<RootNamespace>ConsoleApp</RootNamespace>
<RuntimeIdentifiers>win10-x64;android.21;android.21-arm64;osx.10.12;rhel7.4;centos.7-x64;debian.8-x64;ubuntu.16.10-x64;fedora.26-x64;opensuse.42.1-x64</RuntimeIdentifiers>
</PropertyGroup>

<ItemGroup Condition=" '$(_ShortFrameworkIdentifier)' == 'netstandard' ">
<PackageReference Include="Microsoft.NETCore.Runtime.CoreCLR" Version="1.1.1" />
<PackageReference Include="Microsoft.NETCore.DotNetHostPolicy" Version="1.1.0" />
</ItemGroup>

</Project>
dotnet publish -c Release -f netcoreapp1.1

This will create the build output in ..\bin\Release\netcoreapp1.1\publish which you can then deploy to any system with a compatible version of dotnet core and execute. The contents of the netcoreapp1.1 directory are just build of your app and any solution/project dependencies, but does not contain the rest of the .net libraries that you’ve included. This is a Framework-Dependent Deployment (FDD).

A Self-Contained Deployment (SCD) will create our build as well as include all of the necessary dotnet core libraries to run without dotnet core being installed on the target machine, like a traditional .exe in windows. We can produce one using the following:

dotnet publish -c Release -f netstandard2.0 -r win10-x64

This will produce output in ..\bin\Release\netstandard2.0\win10-x64\publish​. We can package up all of this content in a zip and deploy it to our target OS and run it without dotnet core installed.

The two important things to remember, ensure the two references for CoreCLR and DotNetHostPolicy are present when using the slimmed down NETStandard self-contained deployment and ensure you define a runtime. We could also make an SCD with .netcoreapp1.1 if we define a runtime with the command like so:

dotnet publish -c Release -f netcoreapp1.1 -r centos.7-x64

This produces the “bulkier” version of the SCD. For my simple console app this was a difference of about 15 MB and 29 files compared to using .netstandard2.0.

Upgrading DPM 2012 R2 to 2016

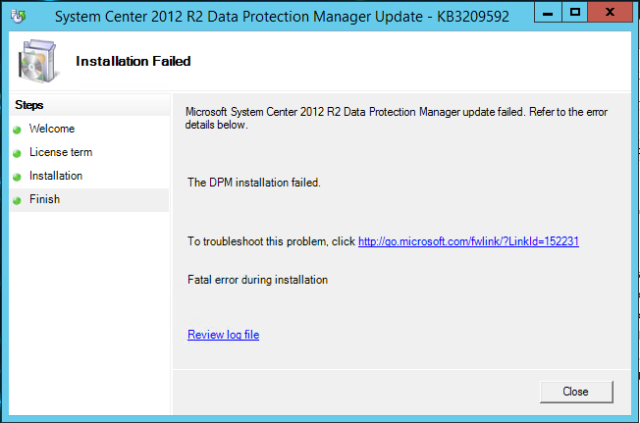
I has a standalone DPM 2012 R2 deployment running on a Server 2012 R2 box with SQL Server 2012 SP1. In order to update to 2016, I knew I needed to update DPM to at least UR10. I grabbed the UR12 installer and ran it, but it failed.

ur12fail

I reviewed the log file, but couldn’t find anywhere explicitly where a step failed, but did see the error:

MSI (s) (14:CC) [08:41:15:684]: Product: Microsoft System Center 2012 R2 Data Protection Manager — Configuration failed.
MSI (s) (14:CC) [08:41:15:684]: Windows Installer reconfigured the product. Product Name: Microsoft System Center 2012 R2 Data Protection Manager. Product Version: 4.2.1205.0. Product Language: 1033. Manufacturer: Microsoft Corporation. Reconfiguration success or error status: 1603.

The server had a pending File Rename operation that required a reboot. I used the Get-PendingReboots cmdlet from my AssetInventory PowerShell module on PowerShell Gallery HERE (shameless plug) . The specific part that resulted in identifying the pending reboot:

Get-ItemProperty -Path "HKLM:\SYSTEM\CurrentControlSet\Control\Session Manager" -Name "PendingFileRenameOperations" | Select-Object -ExpandProperty PendingFileRenameOperations

I tried a reboot, ran it again, and it succeeded.

In order to update SQL 2012 to 2016, the instance needs at least SP2 so I grabbed SP3 for SQL 2012 and installed it. Then I removed all of the client management tools. In SQL 2016, SSMS comes as a separate installer that can be run side-by-side with older versions. If you want to remove it via the command line or ini file, here’s what it looks like:

;SQL Server 2012 Configuration File
[OPTIONS]

; Specifies a Setup work flow, like INSTALL, UNINSTALL, or UPGRADE. This is a required parameter.

ACTION=”Uninstall”

; Detailed help for command line argument ENU has not been defined yet.

ENU=”True”

; Parameter that controls the user interface behavior. Valid values are Normal for the full UI,AutoAdvance for a simplied UI, and EnableUIOnServerCore for bypassing Server Core setup GUI block.

;UIMODE=”Normal”

; Setup will not display any user interface.

QUIET=”True”

; Setup will display progress only, without any user interaction.

QUIETSIMPLE=”False”

; Specifies features to install, uninstall, or upgrade. The list of top-level features include SQL, AS, RS, IS, MDS, and Tools. The SQL feature will install the Database Engine, Replication, Full-Text, and Data Quality Services (DQS) server. The Tools feature will install Management Tools, Books online components, SQL Server Data Tools, and other shared components.

FEATURES=SSMS,ADV_SSMS

; Displays the command line parameters usage

HELP=”False”

; Specifies that the detailed Setup log should be piped to the console.

INDICATEPROGRESS=”False”

; Specifies that Setup should install into WOW64. This command line argument is not supported on an IA64 or a 32-bit system.

X86=”False”

Make sure you install the new SSMS before you try upgrading DPM, otherwise you’ll see an error in the InspectReport.xml file:

And in the DpmSetup.txt logs:

Information : Running the check: SQLServerTools
Information : Getting the check for the checkId : SQLServerTools
Information : Calling the method: CheckSqlServerTools
Information : Check if SQL Server 2012 Service Pack 1 Tools is installed.
Information : Inspect.CheckSqlServerTools : MsiQueryProductState for sql cmdline tools returned : INSTALLSTATE_UNKNOWN
Information : Adding the check result entry for checkId: SqlServerTools and result: 69206016
Information : Getting the error code for check : SqlServerTools and result : 69206016
Information : Found Error Code:SqlToolsNotInstalled and Severity: Error
Information : Got Error Message: SQL Server Management Tools are not installed on this machine.Please install SQL Tools compatible with the installed SQL Server version.

The next step was to upgrade SQL to SQL 2016 SP1 (I’ll come back to this later, if you’re following this write-up step-by-step, just go ahead and install SQL 2016 RTM or SQL 2014 SP2 or read the whole thing first). I ran the installation wizard and everything was successful. Here’s that config file:

;SQL Server 2016 Configuration File
[OPTIONS]

; Specifies a Setup work flow, like INSTALL, UNINSTALL, or UPGRADE. This is a required parameter.

ACTION=”Upgrade”

; Specifies that SQL Server Setup should not display the privacy statement when ran from the command line.

SUPPRESSPRIVACYSTATEMENTNOTICE=”True”

; By specifying this parameter and accepting Microsoft R Open and Microsoft R Server terms, you acknowledge that you have read and understood the terms of use.

IACCEPTROPENLICENSETERMS=”False”

; Use the /ENU parameter to install the English version of SQL Server on your localized Windows operating system.

ENU=”True”

; Setup will not display any user interface.

QUIET=”True”

; Setup will display progress only, without any user interaction.

QUIETSIMPLE=”False”

; Parameter that controls the user interface behavior. Valid values are Normal for the full UI,AutoAdvance for a simplied UI, and EnableUIOnServerCore for bypassing Server Core setup GUI block.

;UIMODE=”Normal”

; Specify whether SQL Server Setup should discover and include product updates. The valid values are True and False or 1 and 0. By default SQL Server Setup will include updates that are found.

UpdateEnabled=”True”

; If this parameter is provided, then this computer will use Microsoft Update to check for updates.

USEMICROSOFTUPDATE=”False”

; Specify the location where SQL Server Setup will obtain product updates. The valid values are “MU” to search Microsoft Update, a valid folder path, a relative path such as .\MyUpdates or a UNC share. By default SQL Server Setup will search Microsoft Update or a Windows Update service through the Window Server Update Services.

UpdateSource=”MU”

; Displays the command line parameters usage

HELP=”False”

; Specifies that the detailed Setup log should be piped to the console.

INDICATEPROGRESS=”False”

; Specifies that Setup should install into WOW64. This command line argument is not supported on an IA64 or a 32-bit system.

X86=”False”

; Specify a default or named instance. MSSQLSERVER is the default instance for non-Express editions and SQLExpress for Express editions. This parameter is required when installing the SQL Server Database Engine (SQL), Analysis Services (AS), or Reporting Services (RS).

INSTANCENAME=”MSSQLSERVER”

; Specify the Instance ID for the SQL Server features you have specified. SQL Server directory structure, registry structure, and service names will incorporate the instance ID of the SQL Server instance.

INSTANCEID=”MSSQLSERVER”

; TelemetryUserNameConfigDescription

SQLTELSVCACCT=”NT Service\SQLTELEMETRY”

; TelemetryStartupConfigDescription

SQLTELSVCSTARTUPTYPE=”Automatic”

; Specifies whether the upgraded nodes should take ownership of the failover instance group or not. Use 0 to retain ownership in the legacy nodes, 1 to make the upgraded nodes take ownership, or 2 to let SQL Server Setup decide when to move ownership.

FAILOVERCLUSTERROLLOWNERSHIP=”2″

; Specifies the SQL Server server that contains the report server catalog database.

RSCATALOGSERVERINSTANCENAME=”Unknown”

; Add description of input argument FTSVCACCOUNT

FTSVCACCOUNT=”NT Service\MSSQLFDLauncher”

; Add description of input argument FTUPGRADEOPTION

FTUPGRADEOPTION=”Rebuild”

Then, I upgraded the OS to Windows Server 2016 so I can take advantage of the new features in DPM that are only compatible with the new OS. I ran setup using the following switches (otherwise you get a blank blue screen when running setup in a VM).

setup.exe /auto upgrade /compat ignorewarning /dynamicupdate enable /PKey &lt;your-product-key&gt;

Prior to upgrading DPM, you may also want to manually install the HyperVPowerShell RSAT service, otherwise the DPM installer will do it and require a reboot.

Now I was ready to run the DPM 2016 installation. I unpacked the ISO and ran setup and was greeted with this warning on the Prerequisites Check screen when you “Check and Install” for SQL Server:

DPM Setup is unable to connect to the specified instance of SQL Server Reporting Service. (ID: 33431)

dpm

I knew SSRS was working just fine, but after some googling, I found this article: http://www.buchatech.com/2014/10/dpm-2012-r2-upgrade-unable-to-connect-ssrs-id-33431/

The issue is that the DPM setup is using WMI to discover SSRS and the old installation wasn’t cleared out. From the logs we can see that the installer makes this query

Information : Query WMI provider for path of configuration file for SQL Server 2008 Reporting Services.
Information : Querying WMI Namespace: \\SERVERNAME\root\Microsoft\SqlServer\ReportServer\RS_SQLINSTANCENAME\V11\admin for query: SELECT * FROM MSReportServer_ConfigurationSetting WHERE InstanceName=’MSSQLSERVER’

The “V11” is the wrong version for what we have installed, it should be “V13” for SQL 2016. To see what versions of SSRS are still registered, you can run this command, replacing the “SQLINSTANCENAME” with the actual name of your SQL instance. For the default instance, this is MSSQLSERVER. Leave the RS_ prefix.

Get-CimInstance -ClassName __NAMESPACE -Namespace root\Microsoft\SqlServer\ReportServer\RS_SQLINSTANCENAME

This returns something like

Name PSComputerName
—-       ————–
V11
V13

So, the next step is to remove the old version

Get-CimInstance -ClassName __NAMESPACE -Namespace root\Microsoft\SqlServer\ReportServer\RS_MSSQLSERVER | Where-Object {$_.Name -eq "V11"} | Remove-CimInstance

Once that is done, I reran the prerequisites, but got a new error:

An unexpected error occurred during the installation.

For more details, check he DPM Setup error logs.

ID: 4387

sqlsp1error

In the DpmSetup.txt log file:

Information : Inspect.CheckSqlServerTools : MsiQueryProductState returned : INSTALLSTATE_DEFAULT
*** Error : CurrentDomain_UnhandledException

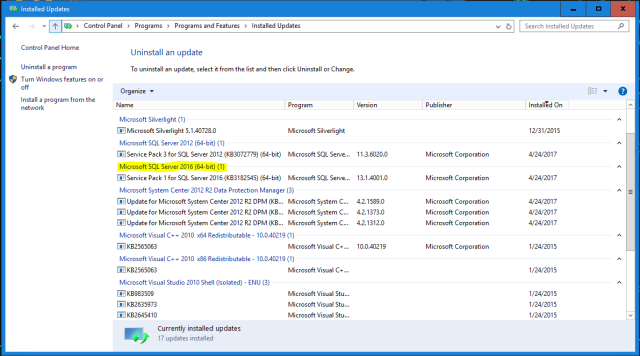
Turns out, this is because SQL 2016 SP1 isn’t supported for upgrading/installing DPM 2016. Luckily, you can remove service packs from SQL using the Programs and Features interface in the control panel.

sqlsp1

This really just launches the ScenarioEngine.exe in C:\Program Files\Microsoft SQL Server\130\Setup Bootstrap\Update Cache\KB3182545\ServicePack\x64.

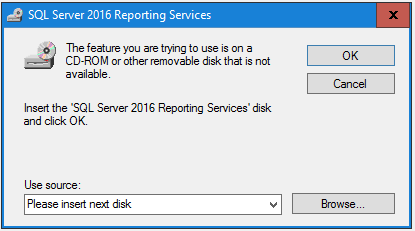
In the middle of the uninstall, you’ll get prompted to locate the msi for SSRS. ssrs-downgrade

Go ahead and re-insert/mount the SQL 2016 SP1 installation ISO. Then, browse to D:\x64\Setup and select the sql_rs.msi. Then the rest of the uninstall of SP1 can continue.

Ok, now that we’re at SQL 2016 RTM, Windows Server 2016, SSRS is correctly registered, SSMS for 2016 is installed, let’s try again. This time the installation fails with a different problem. It’s like a comedy of errors at this point.

dpm-ssrs-fail

The error:

Report configuration failed.

Verify that SQL Server Reporting Services is installed properly and that it is running.

ID: 812

And in the log file:

Information : Deploy reports
Data : Source folder for reports (.rdl files) = C:\Users\administrator\AppData\Local\Temp\DPMD2DE.tmp\DPM2012\setup\DpmReports
Data : Path of dll to invoke = C:\Users\administrator\AppData\Local\Temp\DPMD2DE.tmp\DPM2012\setup\DlsUILibrary.dll
* Exception : => System.Reflection.TargetInvocationException: Exception has been thrown by the target of an invocation. —> System.TypeInitializationException: The type initializer for ‘Microsoft.Internal.EnterpriseStorage.Dls.UI.DlsServer’ threw an exception. —> System.ArgumentNullException: Key cannot be null.
Parameter name: key
at System.Collections.Hashtable.ContainsKey(Object key)
at Microsoft.Internal.EnterpriseStorage.MmcContainer.ManagedFormView.GetPageController(ManagedFormView managedFormView)
at Microsoft.Internal.EnterpriseStorage.MmcContainer.PageController.GetSingletonObject(Type objectType)
at Microsoft.Internal.EnterpriseStorage.Dls.UI.DlsServer..ctor()
at Microsoft.Internal.EnterpriseStorage.Dls.UI.DlsServer..cctor()
— End of inner exception stack trace —
at Microsoft.Internal.EnterpriseStorage.Dls.UI.Library.Reporting.ReportingException.Translate(SoapException spEx)
at Microsoft.Internal.EnterpriseStorage.Dls.UI.Library.Reporting.Reporter.SearchItemInServer(String itemName, String itemPath)
at Microsoft.Internal.EnterpriseStorage.Dls.UI.Library.Reporting.Reporter.CreateReportRootFolder(String serverName, String instanceName, Boolean recreate)
at Microsoft.Internal.EnterpriseStorage.Dls.UI.Library.Reporting.Reporter.InstallReports(Boolean calledFromSetup, String sourceFolderPath, String sqlServerName, String sqlInstanceName, String dbConnectionString)
— End of inner exception stack trace —
at System.RuntimeMethodHandle.InvokeMethod(Object target, Object[] arguments, Signature sig, Boolean constructor)
at System.Reflection.RuntimeMethodInfo.UnsafeInvokeInternal(Object obj, Object[] parameters, Object[] arguments)
at System.Reflection.RuntimeMethodInfo.Invoke(Object obj, BindingFlags invokeAttr, Binder binder, Object[] parameters, CultureInfo culture)
at System.RuntimeType.InvokeMember(String name, BindingFlags bindingFlags, Binder binder, Object target, Object[] providedArgs, ParameterModifier[] modifiers, CultureInfo culture, String[] namedParams)
at Microsoft.Internal.EnterpriseStorage.Dls.Setup.Wizard.ReportingConfiguration.DeployReports(Boolean isRemoteReporting, String sqlMachineName, String sqlInstanceName, String rsMachineName, String rsInstanceName, String installerPath)
Information : Exception occured in DeployReports during upgrade. Rollback to V4.
* Exception : => Report configuration failed.Verify that SQL Server Reporting Services is installed properly and that it is running.Microsoft.Internal.EnterpriseStorage.Dls.Setup.Exceptions.BackEndErrorException: exception —> Microsoft.Internal.EnterpriseStorage.Dls.Setup.Exceptions.ReportDeploymentException: exception —> System.Reflection.TargetInvocationException: Exception has been thrown by the target of an invocation. —> System.TypeInitializationException: The type initializer for ‘Microsoft.Internal.EnterpriseStorage.Dls.UI.DlsServer’ threw an exception. —> System.ArgumentNullException: Key cannot be null.
Parameter name: key
at System.Collections.Hashtable.ContainsKey(Object key)
at Microsoft.Internal.EnterpriseStorage.MmcContainer.ManagedFormView.GetPageController(ManagedFormView managedFormView)
at Microsoft.Internal.EnterpriseStorage.MmcContainer.PageController.GetSingletonObject(Type objectType)
at Microsoft.Internal.EnterpriseStorage.Dls.UI.DlsServer..ctor()
at Microsoft.Internal.EnterpriseStorage.Dls.UI.DlsServer..cctor()
— End of inner exception stack trace —
at Microsoft.Internal.EnterpriseStorage.Dls.UI.Library.Reporting.ReportingException.Translate(SoapException spEx)
at Microsoft.Internal.EnterpriseStorage.Dls.UI.Library.Reporting.Reporter.SearchItemInServer(String itemName, String itemPath)
at Microsoft.Internal.EnterpriseStorage.Dls.UI.Library.Reporting.Reporter.CreateReportRootFolder(String serverName, String instanceName, Boolean recreate)
at Microsoft.Internal.EnterpriseStorage.Dls.UI.Library.Reporting.Reporter.InstallReports(Boolean calledFromSetup, String sourceFolderPath, String sqlServerName, String sqlInstanceName, String dbConnectionString)
— End of inner exception stack trace —
at System.RuntimeMethodHandle.InvokeMethod(Object target, Object[] arguments, Signature sig, Boolean constructor)
at System.Reflection.RuntimeMethodInfo.UnsafeInvokeInternal(Object obj, Object[] parameters, Object[] arguments)
at System.Reflection.RuntimeMethodInfo.Invoke(Object obj, BindingFlags invokeAttr, Binder binder, Object[] parameters, CultureInfo culture)
at System.RuntimeType.InvokeMember(String name, BindingFlags bindingFlags, Binder binder, Object target, Object[] providedArgs, ParameterModifier[] modifiers, CultureInfo culture, String[] namedParams)
at Microsoft.Internal.EnterpriseStorage.Dls.Setup.Wizard.ReportingConfiguration.DeployReports(Boolean isRemoteReporting, String sqlMachineName, String sqlInstanceName, String rsMachineName, String rsInstanceName, String installerPath)
— End of inner exception stack trace —
at Microsoft.Internal.EnterpriseStorage.Dls.Setup.Wizard.ReportingConfiguration.DeployReports(Boolean isRemoteReporting, String sqlMachineName, String sqlInstanceName, String rsMachineName, String rsInstanceName, String installerPath)
at Microsoft.Internal.EnterpriseStorage.Dls.Setup.Wizard.BackEnd.DeployReports(String reportserverConfigFilePath, Boolean isOemSetup, String sqlMachineName, String sqlInstanceName, Boolean isRemoteReporting, String reportingServerMachineName, String reportingInstanceName)
— End of inner exception stack trace —
at Microsoft.Internal.EnterpriseStorage.Dls.Setup.Wizard.BackEnd.DeployReports(String reportserverConfigFilePath, Boolean isOemSetup, String sqlMachineName, String sqlInstanceName, Boolean isRemoteReporting, String reportingServerMachineName, String reportingInstanceName)
at Microsoft.Internal.EnterpriseStorage.Dls.Setup.Wizard.DpmInstaller.DeployReports(Boolean isRemoteReporting, Boolean isUpgrade)
at Microsoft.Internal.EnterpriseStorage.Dls.Setup.Wizard.ProgressPage.InstallerThreadEntry()
*** Mojito error was: ReportDeploymentFailed; 0; None
*** Error : Report configuration failed. Verify that SQL Server Reporting Services is installed properly and that it is running. ID: 812

Unfortunately, the only way I’ve found to resolve this error is to create a new ReportServer database. I did this in Reporting Services Configuration Manager, and then deleted my old ReportServer databases, you may want to keep yours. I tried other solutions like changing the service account to Network Service (I’m using a Group Managed Service Account), adding SSL bindings for the web service/portal endpoints, etc. None of that worked for me.

After the new databases are created, I clicked Resume on the installer and finally got a successful upgrade. Then you can start doing things like updating all of your DPM agents.

Certificate Request Failed due to Validity Period

I recently received this error for a certificate I was requesting through the CA Web Enrollment site.

Microsoft Active Directory Certificate Services

Your certificate request was denied.

Your Request Id is XXX. The disposition message is “Denied by Policy Module The certificate validity period will be shorter than the  Certificate Template specifies, because the template validity period is longer than the maximum certificate validity period allowed by the CA. Consider renewing the CA certificate, reducing the template validity period, or increasing the registry validity period. “.

Contact your administrator for further information.

The certificate template was set to be valid for 5 years. There are 3 reasons you might get this error

  1. The CA’s certificate’s remaining validity is less than the requested validity period of the certificate.

For example, if the CA’s certificate expires in 1 year from today, it can only issue certificates that are valid for 1 year or less. In this case, renew the CA’s certificate with a validity period longer the desired validity period of the certificates you specify. In fact, make it long enough that aren’t having to manually renew it too frequently. For example, if you regularly issue certificates that are valid for 2 years, make the CA’s certificate valid for at least 3 years so you can issue certificates for a year without having to renew the CA cert again (if you made it valid for 4 years, you’d be able to issue certificates for 2 year before you need to renew it, etc).

To fix this problem, you need to modify/create the CAPolicy.inf file at %SYSTEMROOT% (i.e. c:\Windows) with the following text:

[Version]
Signature=”$Windows NT$”

[certsrv_server]
RenewalValidityPeriod=Years
RenewalValidityPeriodUnits=25

Obviously set the values as required, save it and restart the CertSvc service. Then renew the CA Certificate using the same public and private key pair. Lots of details on the syntax and other configuration options are available here: CAPolicy.inf
This was not the case for me however, my issue was related to item number two.
    2. The CA’s policy specifies the longest validity period and your request exceeds it.
Yes, in fact this is specified in the registry at HKEY_LOCAL_MACHINE\SYSTEM\CurrentControlSet\Services\CertSvc\Configuration\Your-CA-NAme in the properties ValidityPeriod (REG_SZ) and ValidityPeriodUnits (REG_DWORD). Mine was set to 2 years, so I increased the ValidityPeriodUnits to 5 years, restarted the CertSvc service, and tried requesting the certificate again. Success. You can also set the values with certutil.
certutil -setreg ca\ValidatePeriod "Years"
certutil -setreg ca\ValidityPeriodUnits 5

PIV/CAC/SmartCard Linked to Multiple AD Accounts

In earlier days, the federal government and the DoD would issue multiple smartcards to system administrators. 1 was their CAC/PIV used to logon to their standard user account, the other was an “Alt Token” which was linked to their administrative account. This construct was a holdover from the Windows Server 2003 AD days where you could only have a 1:1 mapping of UPN on the smartcard to an Active Directory user account. Starting in Server 2008, you can use the altSecurityIdentities attribute of the AD user object to map a smartcard to multiple AD user accounts. There are 5 options to identify the smartcard in that attribute:

Subject and Issuer
• X509:<I>C=US,O=U.S. Government, OU=Agency, OU=Certification Authorities, OU=Agency Issuing CA<S>CN=first.last

Subject DN
• X509:<S>CN=first.last

Subject Key Identifier
• X509:<SKI>ddde2ca4b86db8a908b95c6cbcc8bb1ac7a09a41

Issuer and Serial Number
• X509:<I>C=US, O=U.S. Government, OU=Agency, OU=Certification Authorities, OU=Agency Issuing CA<SR>32000000000003bde810

RFC822 Name
• X509:<RFC882>first.last@agency.gov

You would use the strings at the bullets exactly as listed, except modifying components like the SKI value or serial number. The serial number displayed in the certificate info GUI is reversed (like little endian vs big endian) for what you need to enter in the AD attribute, so for the example above, you’d see the following in the GUI 10 e8 bd 03 00 00 00 00 00 32.

To use the Subject DN and RFC882 styles, ensure you have the Root CA registered in the AD NTAuth store. You can also right click the user AD object and select “Name Mappings” and add a .cer file to create the smartcard association.

Now that we have a single smartcard mapped to several user accounts, how do we know which user account I actually want to log in with when Windows pops up the smartcard at the login prompt and asks me for my PIN? First, we need to disable the Subject Alternative Name for UPN mapping (https://technet.microsoft.com/en-us/library/ff520074(WS.10).aspx). Open this registry key, HKEY_LOCAL_MACHINE\SYSTEM\CurrentControlSet\Services\Kdc and set the property DWORD UseSubjectAltName to 0. This needs to be done on every KDC in the domain. I typically use a GPO with a Group Policy Preference to set this registry key and use a WMI filter to ensure it is applied to all domain controllers. Other domains in the same forest do not need to be updated, unless you’re logging in to those domains as well. Now Windows won’t automatically use the UPN value in the certificate SAN to try and map the smartcard to a user. This means you can leave the UPN value of the AD user object unchanged, which is extremely beneficial for things like Exchange or O365.

The last step is to enable user name hints. Set the Allow user name hint GPO setting in Computer Configuration\Administrative Templates\Windows Components\Smart Card to Enabled.

This GPO setting equates to the registry key HKEY_LOCAL_MACHINE\SOFTWARE\Policies\Microsoft\Windows\SmartCardCredentialProvider and DWORD property X509HintsNeeded. There is a list of smartcard related registry keys and properties here https://technet.microsoft.com/en-us/library/ff404287(v=ws.10).aspx.

Now when a user logs on, they will get prompted for a PIN and a Username hint on the logon screen. The Username hint can be the following types of values:

  • SamAccountName : first.last
  • Domain\SamAccountName : contoso\first.last
  • UPN : first.last@contoso.com

And that should be it on the AD configuration side. You will probably want to set other settings for things like Smartcard removal policies and you will need to ensure a proper PKI setup. For example, registering the RootCA certificates in the NTAuth store if using a third-party CA (like the DoD components do), configuring the Domain Controllers with certificates, ensuring client workstations trust the RootCA, ensure that OSCP or CRLs are available to the domain controllers and client workstations, etc. This is pretty comprehensive for steps for third-party CAs Third-Party CA Setup.

Google Cloud Platform VPN To Fortigate Using BGP

I ventured to set this up, and it was actually easier than I thought. First, I created the settings in the GCP console.

  1. Create a static public IP for the VPN.
  2. Create a GCP cloud router, I chose the default network, the us-east1 region, and the private ASN 65001 for GCP. It’s important to note that only the subnet(s) for the region you select will be advertised in the BGP session.
  3. Create the VPN connection. Select your Fortigate WAN IP as the Remote peer IP address. I chose IKEv2 and entered my shared secret (a plain text password). Then I select Dynamic (BGP) for routing and selected the router I created in step 1. The last step is to add the BGP session. The Peer ASN is the ASN you’re going to use locally, I chose 65002, but this can be an ASN you own or a private one. I left the route priority as default and used 169.254.0.1 for the Google BGP IP address and 169.254.0.2 for the Peer BGP IP address.

That’s it on the GCP side. Now on the fortigate:

I used the GUI to create the IPSec VPN using the “Custom VPN tunnel” template. Essentially you mirror everything you did on the GCP side.

  1. Enter the IP address you created for the GCP VPN as the remote peer, select the WAN 1 interface, and enter the preshared key. I enabled Dead Peer Detection (DPD) and left NAT Traversal on. I also used IKEv2 and didn’t modify any of the Phase 2 settings except to give them a name.
  2. Then I configured the IP addresses on the new sub interface on WAN1 for the IPSec VPN.
  3. Next, you need to configure BGP, enter your ASN, router-id (the IP you configured in GCP for the BGP session), and add a prefix (IP subnet) you want to advertise to GCP. I used 192.168.1.0/24, as that’s where are my servers sit.
  4. Last, create the firewall policy. I used a destination address group of RFC 1918 address blocks since GCP networking can only use private IP addresses (even if you include private IP addresses you’re using, it’s ok, it’s just the policy, and the locally attached route will take precedence. The policy I created was a “route based” policy, meaning I used the VPN interface as the source and destination on two separate firewall policies.

And that should be it. Give it about 30 seconds to let the BGP session come up, then select a VM in GCP in the region you configured the VPN for and try to ping it. The config for the Fortigate was as follows:

! --------------------------------------------------------------------------------
! Google Cloud Platform
! VPN Connection
!
! Your ASN: 65002
! GCP ASN: 65001
! GCP IP: y.y.y.y
! GCP BGP Peer IP: 169.254.0.1
! You BGP Peer IP: 169.254.0.2


! --------------------------------------------------------------------------------
! #1: Internet Key Exchange (IKE) Configuration
!
! A policy is established for the supported ISAKMP encryption, 
! authentication, Diffie-Hellman, lifetime, and key parameters.
! You will need to modify these sample configuration files to take advantage of AES256, SHA256, 
! or other DH groups like 2, 14-18, 22, 23, and 24. 
! 
! The address of the external interface for your customer gateway must be a static address. 
! Your customer gateway may reside behind a device performing network address translation (NAT). 
! To ensure that NAT traversal (NAT-T) can function, you must adjust your firewall rules to unblock UDP port 4500. 
! If not behind NAT, we recommend disabling NAT-T. 
!
! Configuration begins in root VDOM.

config vpn ipsec phase1-interface
  edit "GCP"
    set interface "wan1"

! The IPSec Dead Peer Detection causes periodic messages to be 
! sent to ensure a Security Association remains operational

    set dpd enable
    set nattraversal enable
    set ike-version 2
    set proposal aes256-sha1
    set dhgrp 15
    set keylife 28800
    set remote-gw y.y.y.y
    set psksecret ENC <long base64 encrypted string>
    set dpd-retryinterval 10
    set comments "VPN: GCP"
  next
end

! --------------------------------------------------------------------------------
! #2: IPSec Configuration
! 
! The IPSec transform set defines the encryption, authentication, and IPSec
! mode parameters.
!
! Please note, you may use these additionally supported IPSec parameters for encryption 
! like AES256 and other DH groups like 2, 5, 14-18, 22, 23, and 24.

config vpn ipsec phase2-interface
  edit "GCP"
    set phase1name "GCP"
    set proposal aes256-sha1
    set dhgrp 15
    set keepalive enable
    set auto-negotiate enable
    set keylifeseconds 3600
  next
end

! --------------------------------------------------------------------------------
! #3: Tunnel Interface Configuration
! 
! A tunnel interface is configured to be the logical interface associated 
! with the tunnel. All traffic routed to the tunnel interface will be 
! encrypted and transmitted to GCP. Similarly, traffic from GCP
! will be logically received on this interface.
!

config system interface
  edit "GCP"
    set vdom "root"
    set ip 169.254.0.2 255.255.255.255
    set allowaccess ping
    set type tunnel
    set remote-ip 169.254.0.1
    set interface "wan1"
  next
end

! --------------------------------------------------------------------------------
! #4 Firewall Policy Configuration
!
! Create a firewall policy permitting traffic from your local subnet to GCP and vice versa
!
! This example policy permits all traffic from the local subnet to the GCP
!

config firewall policy
  edit 25
    set srcintf "internal1"
    set dstintf "GCP"
    set srcaddr "Main Network"
    set dstaddr "RFC_1918"
    set action accept
    set schedule "always"
    set service "ALL"
    set logtraffic disable
  next
  edit 26
    set srcintf "GCP"
    set dstintf "internal1"
    set srcaddr "RFC_1918"
    set dstaddr "Main Network"
    set action accept
    set schedule "always"
    set service "ALL"
    set logtraffic disable
  next
end

! --------------------------------------------------------------------------------
! #5: Border Gateway Protocol (BGP) Configuration
! 
! BGP is used within the tunnel to exchange prefixes between GCP and your VPN gateway. 
! GCP will anounce the prefix defined in the BGP session configured as part of the 
! Cloud Router.
! 

config router bgp
  set as 65002
  set router-id 169.254.0.2
  config neighbor
    edit "169.254.0.1"
      set remote-as 65001
      set send-community6 disable
    next
  end

! Enter this portion to explicitly advertise a prefix
  config network
    edit 1
      set prefix 192.168.1.0 255.255.255.0
    next
  end

! Enter this portion to redistribute connected routes, you
! may not want to send all of these

  config redistribute "connected"
    set status enable
  end

! Enter this portion to redistribute connected routes, you
! may not want to send all of these

  config redistribute "static
    set status enable
  end
end

! This portion is optional and probably not needed

config router prefix-list
  edit "default_route"
    config rule
      edit 1
        set prefix 192.168.1.0 255.255.255.0
        unset ge
        unset le
      next
    end
  next
end

config router route-map
  edit "gcp_route_map"
    config rule
      edit 1
        set match-ip-address "default_route"
      next
    end
  next
end

Or after figuring this all out, you realize Google made a document for setting this all up already… groan…

Windows Server 2016 Nano Console Command Line Access

So, this is probably a bug, but I thought it was something interesting to exploit and examine. I was able to get PowerShell access at the console for Nano server. This only works with the PowerShell runtime, not the command prompt.

I have a Windows Server 2016 Nano server running locally on my laptop under Hyper-V. Here’s the console view from Hyper-V initially:

nano1

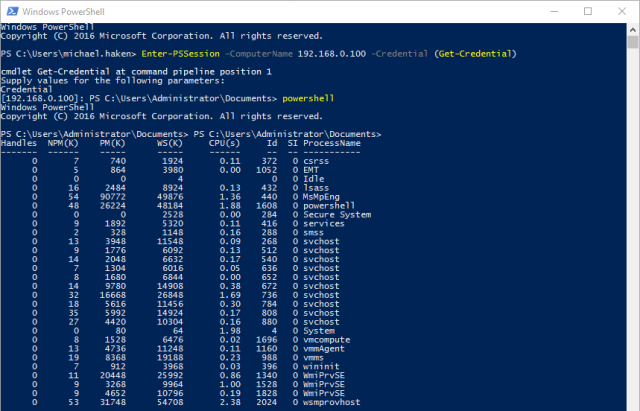
I enter a PSSession with the VM and then execute “powershell.exe”.

nano2

Now the console has changed to a solid cursor:

nano3

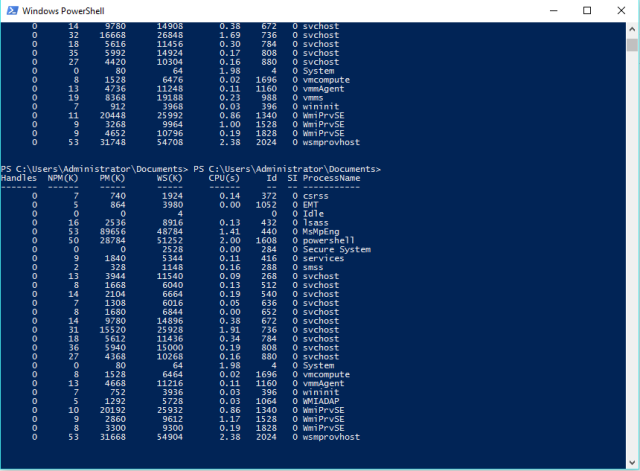
From here, I can enter commands at the console window. The results from stdin and stderr are echoed back to the original PowerShell window.

nano4

nano5

And you can execute non-readonly commands, like Stop-Process. You don’t need to use the -Force switch, it will prompt you at the console window and allow you to input your confirmation.nano6

nano7

I confirmed my user context was the same as what I had started my remote PSSession with:

nano8

nano9

Which you can see that my user name is Administrator, which are the credentials I provided to Get-Credential. So, this essentially gets you console access that persists after the PowerShell session has been closed. Not sure if there’s anything more to do from here, since the same protections for the OS should be in place, but it could be an interesting avenue to test.

Windows ACLs InheritanceFlags & PropogationFlags

This table aligns all of the objects for InheritanceFlags and PropagationFlags to the standard options you see in the GUI.

Apply To InheritanceFlags PropagationFlags
This folder, subfoloders, and files ContainerInherit | ObjectInherit None
This folder and subfolders ContainerInherit NoPropogateInherit
This folder and files ObjectInherit None
This folder only None None
Subfolders and files ContainerInherit | ObjectInherit InheritOnly
Subfolders only ContainerInherit InheritOnly
Files only ObjectInherit InheritOnly

However, setting these propagation and inheritance settings doesn’t necessarily set the permissions on child objects. On the ACL object, there is a method:

SetAccessRuleProtection()

That takes two parameters, isProtected and preserveInheritance.

Result isProtected preserveInheritance
Enables inheritance and replaces all permissions false false
Adds inherited permissions to existing permissions false true
Disables inheritance, removes inherited permissions true false
Disables inheritance, copies inherited permissions true true

Windows How To Delete Unused Network Adapters

Network adapters are stored in the registry at:

HKEY_LOCAL_MACHINE\SYSTEM\CurrentControlSet\Control\Network\{4D36E972-E325-11CE-BFC1-08002BE10318}

Within this key, delete any entries that are no longer used. You can see active network adapters (those that are currently installed whether they are connected or not) with PowerShell:


Get-NetAdapter

Windows Configure IP Settings Using Netsh and PowerShell

Configure a network interface using netsh

 netsh interface ipv4 set subinterface "Local Area Connection" mtu=1500
 store=persistent
 netsh interface ip set address "Local Area Connection" static 192.168.1.1 255.255.255.0 192.168.1.254 255.255.255.0

The above IP addresses are the DNS servers to use.

Or using DHCP:


netsh interface ip set address "Local Area Connection" dhcp

Some other helpful netsh commands:

netsh int ip show ipaddresses : Shows all interface IPs
netsh int ip show subinterfaces : Shows details on each subinterface

Using PowerShell


$Netadapter = Get-NetAdapter -Name Ethernet
$Netadapter | Set-NetIPInterface -DHCP Disabled
$Netadapter | New-NetIPAddress -AddressFamily IPv4 -IPAddress 192.168.1.1
-PrefixLength 24 -Type Unicast -DefaultGateway 192.168.1.254
Set-DnsClientServerAddress -InterfaceAlias Ethernet -ServerAddresses
192.168.1.1

The above sets the network adapter named “Ethernet” to use a static IP address with a default gateway and DNS servers.